England is SO English. Yesterday I did the walk near Mum's that goes up a wide pathway between a new woodland development and the scout hut/bowls green/tennis court, thence to the allotments and the parish church. There was a wedding party out front having their pictures taken. The bride wore a restrained wedding dress, stiff satin with heavy embroidery on the front of the skirt and a bolero jacket with a high back neck and cut away front. The wedding guests were mainly hatted, and tastefully dressed.
Today I did parts of the same walk. This time I went through the woodland, which has been in existence about 5 years, I think. A local landowner bought the fields and donated them to the trust, to avoid yet more executive villas. It's become quite a philanthropic venture. Local people donate £200 for a named tree or less for a smaller tree anonymously planted. We have one tree for my Auntie Pat, who died 2 years ago, and one from Mum and me for gratitude for each other. I met a lady out for a walk and got chatting since we were both sans dogs (most people are dog walking). She said she had to get home to listen to the Omnibus Archers! Further on I met a young woman clopping along on a large cob horse, his tail brushed and reaching to his hairy fetlocks.
The green of an English spring is like no other. And the smell of the different weeds and wildflowers is quite particular as well. Nettles, brambles and ground elder, mixed with apple, bluebells and campion.
It does remind me so vividly of my childhood years, and going for local walks with Mum and my brother. Dad never came - too many hobbies in his various sheds!
Sunday, May 17, 2009

Saturday, May 9, 2009
Out of the closet
Having put my creative projects on a shelf for a time, I got out an old UFO. This had been languishing in the cupboard for at least 6 years. I started it as a BOM in 2001, just before I went to live in Italy. I remember crouching on the floor of my attic apartment, stifling in the summer heat, cutting strips and square and triangles. I think I pieced a lot of them when visiting my parents, where my father was recovering from a car accident where he broke his pelvis.
Anyway, it is 60 by 83 inches, and greens and purples, representing the vineyards in Marlborough. Luckily I still like it.
I started on the quilting last week. I did some meander round the vines, and that looks good. Then I put on the walking foot and have been doing some of the blocks and borders. Because of the size and the weight of the quilt, I am having to do two passes round the blocks, one left and one right, so I don't have to rotate the entire thing. It's a bit like ploughing a paddock or mowing a lawn. The outside passes take a lot longer than the middle ones. I worked out when I was discing or rolling a paddock once, that if you divide the sides of the paddock into 10, then when you have done the 3 outer rows, you have done half the area.
I've experimented with various threads, including metallics, but the subject matter keeps telling me it doesn't want glitz, so half the time I am using standard white economy thread and it looks fine.
I don't think I will finish before I go to the UK on Thursday, but it probably won't need much longer.
It is great to get it out of my UFO box, because it took up heaps of room. It's made with high loft poly batting, so pretty bulky.
Anyway, it is 60 by 83 inches, and greens and purples, representing the vineyards in Marlborough. Luckily I still like it.
I started on the quilting last week. I did some meander round the vines, and that looks good. Then I put on the walking foot and have been doing some of the blocks and borders. Because of the size and the weight of the quilt, I am having to do two passes round the blocks, one left and one right, so I don't have to rotate the entire thing. It's a bit like ploughing a paddock or mowing a lawn. The outside passes take a lot longer than the middle ones. I worked out when I was discing or rolling a paddock once, that if you divide the sides of the paddock into 10, then when you have done the 3 outer rows, you have done half the area.
I've experimented with various threads, including metallics, but the subject matter keeps telling me it doesn't want glitz, so half the time I am using standard white economy thread and it looks fine.
I don't think I will finish before I go to the UK on Thursday, but it probably won't need much longer.
It is great to get it out of my UFO box, because it took up heaps of room. It's made with high loft poly batting, so pretty bulky.
Thursday, April 30, 2009
Various experiments, most not a great success
Several thermofax screens arrived this week, some pre-made and others from my own photos. I tested one, and when I washed it out, it came adrift from the frame, which is a bit disappointing. When I get enthused again, I will re-attach it with duct tape this time. One of the ones from my Japanese stencils is not perfect - partly my fault for not double checking the photo, which I had converted to b and w, but there were still some pixels of the wrong colour in the wrong place. I think I have found a tool in Photoshop to remove all the white areas, so at least they will be blank. Then I had to adjust the blacks, as there were some charcoal grey pixels. All imperfections show up on the screen. This afternoon I tested all the others. The other Japanese stencil one is fine, and one of the smaller purchased screens also came partly adrift. I am not sure I will be a fan of thermofaxes. To be honest the freezer paper stencils on the normal screens worked the best.
Having postponed the poppy project until I can get to London to look for my print, I tried to finish the map of the islands idea. This started as a piece of calico that I blobbed all my blue paints on, to see what they looked like, plus a purplish blue. After that I spritzed it with Mountain Mist or whatever it's called - the walnut ink one. I added a couple of borders, and left it till I got back from Wellington. I then decided to trial quilting all over the borders as well as the centre, with the same kind of lines. I wanted to get away from having separate quilting stitches for each part of the quilt. I used some 40wt variegated threads, and some metallic, and one 30 wt. Then round the three 'islands' I did some thicker thread using the bobbin. So far so good.
Having postponed the poppy project until I can get to London to look for my print, I tried to finish the map of the islands idea. This started as a piece of calico that I blobbed all my blue paints on, to see what they looked like, plus a purplish blue. After that I spritzed it with Mountain Mist or whatever it's called - the walnut ink one. I added a couple of borders, and left it till I got back from Wellington. I then decided to trial quilting all over the borders as well as the centre, with the same kind of lines. I wanted to get away from having separate quilting stitches for each part of the quilt. I used some 40wt variegated threads, and some metallic, and one 30 wt. Then round the three 'islands' I did some thicker thread using the bobbin. So far so good.
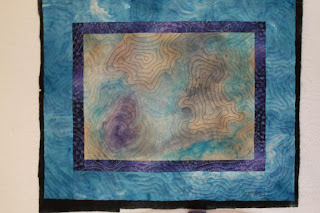
I obviously needed to make the island shapes more distinct, as from a distance you couldn't make them out. I used metallic oil pastels round the edge. Then I added a mixture of shiva paintsticks inside those lines. I was playing with a treasure map idea by this time. I plotted the voyage of an imaginary ship. Added a funicular to the top of one mountain, and a couple of footpaths on the other two islands, using the stitch where you have invisible in the top and coloured in the bobbin and it makes a dashed line. Had to have the top tension on 9 to make it work!
I played with beads in the centre, but again, from 3 metres you couldn't see them. I tried bigger and bolder beads, but didn't like the effect.

 Since it would involve stitching at least 200 seedbeads, and I wasn't going to like the finished thing, I put all the beads back in their jars! My latest idea is to print some mappish names like Smugglers Cove onto transfer paper and label the map. Much scratching of head later, I think I am ready to put a back on it and forget the whole thing, as just a learning exercise. There are things I really like about it, and the whole map plus contour lines idea is one I think I will play with some more.
Thursday, April 23, 2009
Life since Wellington
When I had stashed away all my new purchases and had a quiet day to recover, I got back on the quilting horse. Well, I tried to. The poppy project had made a small amount of headway on the design front, but I really need a botanical drawing to continue. I researched our local library and the Christchurch one and online, but have not really found anything like I have in mind. I want the black and white anatomically correct drawing of all parts of the plant, plus preferably some text as well.
Since I have the chance to go to a Botanical Art Museum in London next month, I have iced the project for now.
Meantime I have played with a piece of handpainted fabric that I put borders on just before Wellington. I have quilted it in contour lines, and it now looks like there are 3 islands in the sea. The point of the exercise was to try to quilt over the entire piece without making the separate quilt stitching that I've always done for borders. It wasn't so hard! In fact, although I used several different topstitching threads, you can really only see the madeira fs black core metallic from a distance of 3 metres. The other threads just merge into the quilt. The next problem is to make the islands more distinct. I tried oil pastels round the edge of them, but they need more definition still. If it works out OK I have a lot of beading to add in the centre, but I won't do that until I know that the piece is worth it!
Can't add pictures right now, as Photoshop is having a bad day.
Since I have the chance to go to a Botanical Art Museum in London next month, I have iced the project for now.
Meantime I have played with a piece of handpainted fabric that I put borders on just before Wellington. I have quilted it in contour lines, and it now looks like there are 3 islands in the sea. The point of the exercise was to try to quilt over the entire piece without making the separate quilt stitching that I've always done for borders. It wasn't so hard! In fact, although I used several different topstitching threads, you can really only see the madeira fs black core metallic from a distance of 3 metres. The other threads just merge into the quilt. The next problem is to make the islands more distinct. I tried oil pastels round the edge of them, but they need more definition still. If it works out OK I have a lot of beading to add in the centre, but I won't do that until I know that the piece is worth it!
Can't add pictures right now, as Photoshop is having a bad day.
Quilted out temporarily
Two weeks have passed since my last post, during which time I went to the quilt festival in Wellington. This national event happens every other year, and sometimes in the North Island and others in the South. I had toyed with the idea of going, but when my neighbour and quilt tutor at QW, Lyn Winter, asked me to step in as room-mate, it all became a concrete plan. I registered for 5 days of classes, got accepted for 4 and then added an extra class. In addition to the classes, there were lectures every lunchtime and most evenings, by the overseas tutors. There were some well-known names, Dena Crain, Jenny Bowker, Ann Fleeton, Libby Lehman, Vikki Pignatelli and Gloria Loughman, being the ones I remember at the moment.
The venue did not compare favourably with Long Beach. No glossy conference centre, carpets etc. This was a girls' school, complete with 5 floors, several outlying prefabs, and some classes having to be held in chemistry labs etc. High stools, gas supplies on the bench etc. The one day that we were working on sewing machines, we had a normal classroom, but very cramped for 15 people, plus gear. Out of the 5 days, there was one class that stood out and that was Vikki Pignatelli's manipulating fabric. She gave a lot of examples, talked non-stop, and we got to try out a few options. They were all in her book Improvisational quilts, which I've had for a while, but it was much better to see everything in the flesh. To be honest, the other classes I took were either going over ground I already knew pretty well, or didn't cover what I imagined they would.
Don't get me wrong - I enjoyed the trip! It was so inspiring to be surrounded by people all learning, sharing and creating, and then have the exhibitions and merchants mall to look at as well. I particularly valued the chance to look through several books on my wish list. Luckily for my pocket, I decided I didn't need them at all! They were the Art quilts at play new title by Davila and Waterston, Lesley Riley's book on Lutradur, and some others I forget right now. The one I think I will buy later is Dyeing to Stitch by June Barnes.
I did buy quite a few mixed media items, like abaca paper, more Misty Fuse, burnaway, friendly plastic. There were heaps of threads which we can't get locally, so I bought several sample boxes and some variegated king tut and other threads. When I got home, there was nothing that I regretted. Well, there were a few things I had bought for classes that we didn't need at all, so that was a minor pain.
The venue did not compare favourably with Long Beach. No glossy conference centre, carpets etc. This was a girls' school, complete with 5 floors, several outlying prefabs, and some classes having to be held in chemistry labs etc. High stools, gas supplies on the bench etc. The one day that we were working on sewing machines, we had a normal classroom, but very cramped for 15 people, plus gear. Out of the 5 days, there was one class that stood out and that was Vikki Pignatelli's manipulating fabric. She gave a lot of examples, talked non-stop, and we got to try out a few options. They were all in her book Improvisational quilts, which I've had for a while, but it was much better to see everything in the flesh. To be honest, the other classes I took were either going over ground I already knew pretty well, or didn't cover what I imagined they would.
Don't get me wrong - I enjoyed the trip! It was so inspiring to be surrounded by people all learning, sharing and creating, and then have the exhibitions and merchants mall to look at as well. I particularly valued the chance to look through several books on my wish list. Luckily for my pocket, I decided I didn't need them at all! They were the Art quilts at play new title by Davila and Waterston, Lesley Riley's book on Lutradur, and some others I forget right now. The one I think I will buy later is Dyeing to Stitch by June Barnes.
I did buy quite a few mixed media items, like abaca paper, more Misty Fuse, burnaway, friendly plastic. There were heaps of threads which we can't get locally, so I bought several sample boxes and some variegated king tut and other threads. When I got home, there was nothing that I regretted. Well, there were a few things I had bought for classes that we didn't need at all, so that was a minor pain.
Thursday, April 9, 2009
Japanese stencils
The first time I went to Japan Noriko took me to Kyoto and we went to some small shops hidden away behind blank wooden frontages in the craft district. We went to a fantastic place that made shibori silk scarves. They were all different colours, but not the stripey looks we imagine with the term shibori. They had been stitched and sometimes multi-dyed but others were single colours. Finest silk, left with the pleating as a texture. I bought a pale peach one, to use as a summer wrap for the opera. Needless to say it's only been out of its bag twice in 5 years!

Another place we visited was an indigo dyer. They have to dye the indigo fabric up to 20 times to get the really deep blue, so it's very labour intensive, and I imagine fairly toxic. They had hundreds of used stencils of patterns they use. I think they said they were made of a rice paste, and hand cut. I've had mine in the drawer for those 5 years. I did try stencilling with paintstiks and paint a while ago, but it was only moderately successful. Today I did a couple of pulls with the stencils under a silk screen. I mixed up some yellow and a bit of red textile ink, which made a very unpleasant colour, but then added quite a bit of white and it seemed a bit like mayonnaise mixed with ketchup. However, in the pull, it looked almost metallic gold until it dried, and the colour is much nicer than it first appeared. I did one pull on the reverse of one of the leaf samples and one on polycotton.

After that I spent at least 2 hours with photoshop elements, cleaning up photos of the stencils, as I decided they were too fragile to use for screens which needed washing frequently. My plan now is to get thermofaxes made of them, which are almost indestructible. I don't know if I would seriously use them a lot, but I like the mottled effect of the chrysanthemum one, and the plum blossoms are very appealing.

Wednesday, April 8, 2009
Poppies and crosses
My poppy project has been morphing slightly in my subconscious. I often wake up early in the morning with a new idea to try. Originally I was going to have several images of poppies tranferred onto fabric with only one of them red and rest black and white botanical drawings. On top of that I wanted to superimpose a red flanders poppy centred over some gauze bandage in the shape of a cross. I still want that for the top layer, but below that I want something to represent the hundreds of crosses in the WW2 war cemeteries.


A week of mixed success with experiments. I have made two trial poppies for the top layer of my 3 level proposed remembrance textile/plexiglass artwork. One is so almost what I was aiming for that I might use it. I embroidered the stamens with machine and hand stitches and then beaded the centre. I fused 3 layers of sheers with two layers of misty fuse in the sandwiches. I did several different blends of sparkle organza, nylon, acetate and others in reds and oranges. I traced the poppy shape, which is basically two layers, with 2 petals in each. Then cut them out with a burning tool. Some cut really cleanly and some gave a black tarry edge, which I then cut off. Since the pieces are fused anyway, I probably don't need to sear the edges. I tried embroidering the edge of one half, and drew shading line on the other half. But from 6 feet the plain one looks just as good, and maintains the fragility of the petals.
I tried drawing and crayonning with various media on a scrap of TAP (transfer paper) which I ironed on to the knitted off white fabric I want to use for the bottom layer. I ironed it on the normal cotton setting, and although every colour and ink transferred apart from the watercolour, quite a lot was left on the Transfer backing, which isn't supposed to happen.
I bought some grass green canvas to embroider crosses on and spent ages with photoshop elements trying to isolate the crosses to use for a stencil. I think I am abandoning the canvas, as the embroidered crosses don't have enough impact from a distance. Then I tried a freezer paper stencil on the back of a silkscreen and pulled opaque white ink through it onto blotchy green and black fabric. I like that look. Not sure if I want a whole layer of them or just half a layer, or some bold and some fading away. The screen is not precise enough - too easy to get odd droplets of ink where you don't want them. My next thought is carve a stamp, which would be much easier to place.
The most spectacular failure was with trying to tranfer inkjet prints onto plastic standing in for the plexiglass. I think mainly because the acetate sheets were for carbon toner not inkjet. Maybe I should have let the ink dry a whole day first. I also tried printing onto the shiny side of freezer paper which wouldn't even feed through the printer taped to a carrier sheet. I really had to give up at that stage, but will revisit it later. I bought an Epson printer this week because I wanted the pigment ink. It was only $71, whereas the replacement cartridges are more than $25 each. Does this mean I have to buy a new printer every time the cartridge runs out?
I am wanting a botanical print of a poppy plant, complete with root system. Since I can't draw, I have been trawling for free online images, with not a great deal of success. I have found a simple tap root drawing in one of Jane's books, which I could graft on to the poppy plant possibly.
I'm off to Quilt Wellington on Friday, so poppies will have to wait.
Tuesday, March 31, 2009
Bits and pieces
Now that my cosmos piece is out of the way, I have been dabbling. A few more screen prints and a couple of attempts at sunprinting. Last weekend was our last of daylight saving, and it was a beauty. I used oak leaves as a resist, and made several samples using 3 different fabrics. I found the wicking problem only happened on the poplin, so won't use that again with inks. The best results were from printing the actual leaves after screening. A nice texture, with a bit of colour variation.

Yesterday I was playing with FMQ one of the poppy prints. Although I used 4 different reds, from a distance you almost can't detect any difference and the centre one was actually a dark maroon. Quite a good lesson, that values really need spicing up for impact. I did a narrow zigzag, which gave better coverage that straight stitching, but didn't really help make the texture look realistic. I can carry on with the leaves today and then the background, all just practice and harmless!
Unusually for me, my first job even before breakfast was to clean my hob and bench. That was because I had just got my new miracle Enjo cloths, which you use with just cold water, and no chemicals. I would say 95% effective, but had to resort to Jif for a few tacky old grease spots. It said you could use it on your glass fire door, so I tried that as well and it was good. The only drawbacks I have found so far, is that the cloths need somewhere to hang to dry. And putting on a mitt soaked in cold water is not an erotic experience. Could be downright nasty in winter.
I've spent a deal of time the last few days trawling the internet for info about slice quilts and then suitable photos for dividing. When we did a poll last week the consensus was for landscape and vertical slices. Now people are backtracking and going off on tangents and we need to keep refocusing. I also keep thinking about the feasibility of the blocks and the look of the finished
quilt. Some people want to do their own thing, and others want to follow a design, some even more literally want to recreate something.
Once we get going I am sure it will be OK, even allowing that one or two people might not make it through to the finished product.

Yesterday I was playing with FMQ one of the poppy prints. Although I used 4 different reds, from a distance you almost can't detect any difference and the centre one was actually a dark maroon. Quite a good lesson, that values really need spicing up for impact. I did a narrow zigzag, which gave better coverage that straight stitching, but didn't really help make the texture look realistic. I can carry on with the leaves today and then the background, all just practice and harmless!
Unusually for me, my first job even before breakfast was to clean my hob and bench. That was because I had just got my new miracle Enjo cloths, which you use with just cold water, and no chemicals. I would say 95% effective, but had to resort to Jif for a few tacky old grease spots. It said you could use it on your glass fire door, so I tried that as well and it was good. The only drawbacks I have found so far, is that the cloths need somewhere to hang to dry. And putting on a mitt soaked in cold water is not an erotic experience. Could be downright nasty in winter.
I've spent a deal of time the last few days trawling the internet for info about slice quilts and then suitable photos for dividing. When we did a poll last week the consensus was for landscape and vertical slices. Now people are backtracking and going off on tangents and we need to keep refocusing. I also keep thinking about the feasibility of the blocks and the look of the finished
quilt. Some people want to do their own thing, and others want to follow a design, some even more literally want to recreate something.
Once we get going I am sure it will be OK, even allowing that one or two people might not make it through to the finished product.
Friday, March 27, 2009
Moving on at last

I finished quilting the steel colony piece yesterday, and trimmed it ready for framing. Very hard to photograph with the beads and the metallic border fabric. I am thinking of changing the name to microcosmos, because it is a magnification of the steel, but also has a stars in space feel.

Read a couple of interesting blogs yesterday about changing linguistic habits, like eliminating 'but' and putting 'and instead. Could easily have done that in the sentence above.
I haven't done anything creative today, but struggled to get on with more Japanese writing homework. I CAN find the relevant information in the previous workbooks, but it would be so much better if I could remember any of it without checking. It's getting to the end of the month, and time for my clear-out day and my goal-setting day. The clearing out is going OK but I usually find a heap of things I need to do to prevent me doing the goal setting! Learning some vocab would be good, even if only 5 words a day.
I've suggested a slice quilt to the group and we are starting to think about what kind we want to do. There seem to be about 8 or 9 people interested, which is a good number. We could do it with 4 or 5, and anything above 9 is getting unwieldy.
Plan is to do the poppy piece next up. I like the leaf stencil I have, and am thinking about expanding the line drawings I have to separate the elements.
Sunday, March 22, 2009
Steel colony

 the original photo
I am working on the borders now. Rather irritatingly the borders have grown and want to be as wide as the fabric I have cut, and that is actually a little bit wider than the batting. That means I have to graft on some more batting. I went to the picture framers this week to talk about framing it, and it's going to cost around $100 for something fairly simple, no mat, just glued to acid free card. I think I will try the people who do Jane's framing.
Some friends came to lunch today and were talking about the kind of money I should be asking for it, and that was about 3 times what I thought. No idea what people will pay, but it's not something I want to give away cheaply.
The other thing I started this weekend was my screen printing projects for the class I am doing at QU. I did a newspaper stencil yesterday - which didn't excite me. Then today I cut a stencil of a poppy leaf and stem out of freezer paper and that was reasonably successful. The only problem is that a weak colour oozes out of the inked print while it is drying. For a lot of things that won't matter greatly, but it could be an issue. I am using the Fasttex inks, which seem very thick and gloopy. I am lucky that I bought a remaindered book of flowers and stems stencils when the fashion for stencilling every wall and cupboard door went out of the window, so to speak!

Subscribe to:
Posts (Atom)
